Click on image in gallery to see full page...
|
Today we will draw the still life for the first half of class. You may listen to music in order to stay focused, but you must have your must already set up on your phone or computer so you don't have to mess with them during class. Cell phones should be in your pocket. Computers should be pushed aside and almost closed. We will add value to this Still Life the first 10 minutes of class on Tuesday ad Thursday. Task#1: Lightly block in your composition using a pencil. Think about rule of thirds and how to select a good view point. Task#2: Start blocking in your value. Use smooth value transitions. Think about the basic shape chart how you applied value to render a form that looks 3D. The lights are off and we have spot lights on the still life to make the values easier to see. Task#3: 4 square plant design for homework. We will draw the dividing marks on your paper. One line going vertically down the middle 4 1/4 inches from the edge and another line going horizontally dividing the paper at 5 1/2 inches. Task#4: Start Homework Find two adjacent sections one will be positive space (the positive part of the drawing will be totally colored in with a 5 value) then the opposite section will have the negative space (the negative space will be filled in with 5 value the positive space will be completely white). The other two adjacent sections will be either contour line or value. (the negative space will be filled in with 5 value the positive space will be completely white).  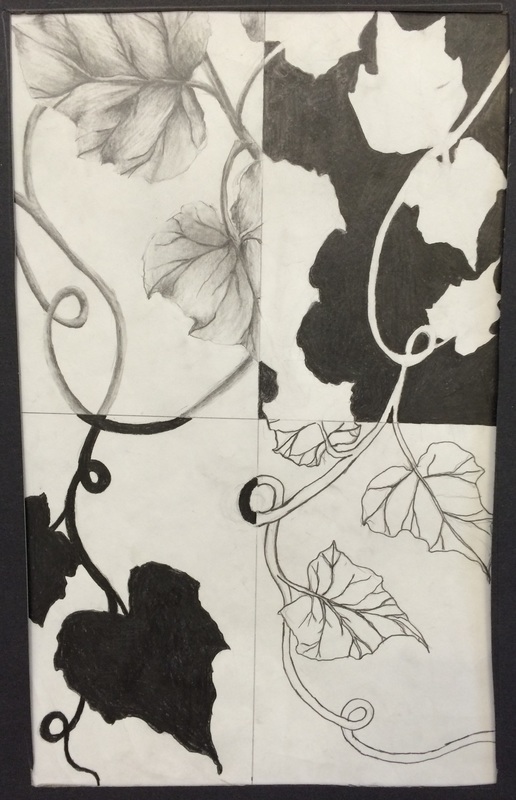 Warm-up: Read blog and take notes on the different task for today.
Get out value scales and basic shape chart. Task#1:Blog Post Quiz I will be giving you a quiz over the contents of todays blog. Please read whole blog and take notes on today task. Task#2: Crosshatching Guided Practice: Demonstration I will demonstrate how to use crosshatching to complete the basic shape chart for crosshatching. Independent Practice:Basic Shape Chart Crosshatching You will complete the second column of your basic shape chart with crosshatching. Practice the shapes with flat sides first. Remember to use curving lines for curving shapes (cylinder, cone, sphere). Use straight lines for your more the shapes with flat sides and sharper angles (pyramid, cube). Task#3: Organic shading Guided Practice: Demonstration I will demonstrate how to create a value scale with organic shading, as well as, demonstrate how to apply the value to the basic shape chart. Independent Practice: Organic Value Scale and Basic Shape Chart After the demonstration you will work on your value scale with organic. You will then apply those values to the basic shape chart. Task#4: Stippling Guided Practice: Demonstration I will demonstrate creating a stippling value scale. We will not use the whole scale. Independent Practice: Stippling Value Scale You will need to divide your value scale in half. Do not stipple the whole value scale (it will take forever). Take the top half of the value scale and apply stippling to create 1-5 values. We will not apply stippling to our Basic Shapes. Task#5: Four Square Plant I will handout white paper for you to draw your plant or flower image. If you have your computer you will go to our google drive folder using this link (https://drive.google.com/folderview?id=0BznGzFiOk38COUlTSGRsTE1GWWM&usp=sharing ). Make sure you drawing takes up the whole paper. Try to have part of the image go off the paper on a few sides. Work large!!! DO NOT ADD VALUE!!! Homework: Free Sketch Free Sketch is due Monday (10/5) |
Art
|


 RSS Feed
